School is beginning to stress me out. It's my last semester and I'm taking 15 hours and writing an honors thesis. Ugh. All I really want to do is read the books I want to read (right now I'm reading The Sweetness at the Bottom of the Pie) and cook and eat all day. Instead, today I will study for for my Biochemistry test, start writing my thesis, and read for my English class... after I cook and eat :)
Asian Salmon
Adapted from The Barefoot Contessa
2 salmon fillets
1 Tbsp Dijon mustard
1 Tbsp low sodium soy sauce
2 1/2 Tbsp good olive oil
1/4 tsp minced garlic
1/4 tsp light brown sugar
1/4 tsp ginger powder
1. Preheat oven to 400 F. Whisk together the Dijon mustard, soy sauce, olive oil, garlic, sugar, and ginger powder in a small bowl. Drizzle half of the marinade onto the salmon and let sit for 10 minutes.
2. Make a foil packet for the salmon (discard the marinade) and bake in the oven for 15-20 minutes.
3. Transfer the fish to a flat plate and spoon the reserved marinade on top. Let sit for 10 minutes before serving.
Serves 2; I served it with sauteed asparagus
While I was waiting for the salmon to bake, I decided to play with my camera and the fairy lights I strung around my bed last night. The results:
Wednesday, January 27, 2010
Tuesday, January 26, 2010
Sunday, January 24, 2010
Baked Pasta with Bechamel Sauce
The beauty of making more sauce than you will eat in one sitting: leftovers. Yesterday's bechamel sauce became today's pasta sauce. This baked pasta could easily disguise itself as grown-up mac and cheese and with the bechamel sauce already made, it took less than 30 minutes to make.
Baked Pasta with Bechamel Sauce
1/4 pound dry pasta
1/2 to 2/3 cup Bechamel sauce
1 tsp onion powder
Salt and pepper, to taste
1/3 cup grated Swiss cheese
1 Tbsp unsalted butter, diced
1. Preheat oven to 425 F.
2. In a large pot, bring 5 quarts of salted water to a boil. Add the pasta and cook for about 5 minutes. Drain. Return pasta to the pot and pour in the bechamel sauce. Add the onion powder and salt and pepper to taste. Mix with a wooden spoon until all the pasta is coated with sauce.
3. Pour the pasta into a greased baking dish. Smooth out the top and top with grated Swiss cheese. Dot with diced butter and bake for 20 minutes or until it is bubbling and the top is golden brown.
Serves 1
Saturday, January 23, 2010
Crepes a la Florentine (almost)
My roommate is the best. We went to watch Julie & Julia last year and she got me Julia Child's Mastering the Art of French Cooking for Christmas! We've been wanting to make beef bourgignon but the recipe is not in the Volume 1 cookbook. So instead we are having crepes! A very French dish indeed.
I warn you, this dish is time intensive and not for the beginner chef (not to be confused with an overly-ambitious-yet-still-beginner chef like myself). But if you have a good amount of time and want a (very) yummy dish, try it out. Instead of filling the crepes with a spinach filling and a mushroom filling (the cookbook says to make two separate fillings then add both to the crepe), I filled it with the spinach filling then added some mushrooms and chopped chicken. Also, unless you want to eat 10 crepes each, this recipe makes more than enough crepes for one dish. The crepes freeze well; just lay a sheet of wax paper between each crepe and freeze.
Crepes a la Florentine (almost)
Adapted from Mastering the Art of French Cooking
Crepes (25 to 30 crepes, 6 to 6 1/2 inches in diameter):
1 cup cold water
1 cup cold milk
4 eggs
1/2 tsp salt
1 1/2 cups flour
4 Tbsp melted butter
1. Pour the liquids, eggs, and salt into a blender jar. Add the flour, then the butter. Cover and blend at top speed for 1 minute. If bits of flour adhere to sides of jar, dislodge with a rubber scraper and blend for 2 to 3 seconds more. Cover and refrigerate for at least 2 hours.
2. To make crepes, brush an iron crepe pan or skillet lightly with cooking oil. Set over moderately high heat until the pan is just beginning to smoke. Immediately remove from heat and, holding handle of pan in your right hand, pour with your left hand a scant 1/4 cup of batter into the middle of the pan. Quickly tilt the pan in all directions to run the batter all over the bottom of the pan in a thin film. (Pour any batter that does not adhere to the pan back into the bowl; judge the amount for your next crepe accordingly.) Return the pan to heat for 60 to 80 seconds. Then jerk and toss pan sharply back and forth and up and down to loosen the crepe. Lift its edges with a spatula and if the underside is a nice light brown, the crepe is ready for turning. Turn the crepe by using 2 spatulas, your fingers, or toss it over by a flip of the pan. Brown lightly for about 1/2 minute on the other side.
Bechamel with cheese sauce (3 cups):
5 Tbsp flour
4 Tbsp butter
2 3/4 cups boiling milk
1/2 tsp salt
1/8 tsp pepper
Big pinch of nutmeg
1/4 cup whipping cream
1 cup grated Swiss cheese
1. Cook the flour and butter slowly together in a 1/2-quart saucepan for 2 minutes without coloring.
2. Off heat, beat in the boiling milk and seasonings. Boil, stirring, for 1 minute.
3. Reduce to simmer and stir in cream by tablespoons. Remove from heat. Stir in all but two tablespoons of the cheese. Film top of sauce with milk to prevent a skin from forming.
Spinach, Mushroom and Chicken Filling:
3 Tbsp minced onions
2 Tbsp butter
1 bunch blanched chopped spinach
1/4 tsp salt
1/2 cup sliced mushrooms
1 cup chopped cooked chicken
1. Cook the onions in butter for a moment in an enameled saucepan. Add spinach and salt, and stir over moderately high heat for 2 to 3 minutes to evaporate moisture. Stir in 1/2 to 2/3 cup of the bechamel sauce, mushrooms, and chopped chicken. Cover and simmer slowly for 8 to 10 minutes, stirring occasionally.
Making a filled crepe and baking:
1. Turn on the broiler.
2. Pour two spoonfuls of the filling down the center of each crepe. Fold the sides over the filling and place in a buttered baking dish. Use the remaining bechamel sauce and grated Swiss cheese for topping. Set under the broiler for 10-15 minutes or until the edges of the crepe begin to brown.
Yield: 4 filled crepes
Friday, January 22, 2010
Chicken and Asparagus
Last night I played Rockband for the first time. I play Guitar Hero pretty well and really get into "Hit Me With Your Best Shot" but Rockband is a whole different story. I don't understand how to play the drums unless the notes are on the lines and spaced out really far. The notes that are really close together? Nope. Can't do it.
But something I can do is make this chicken. I've made it several times before and like to vary the cheeses. Fontina is good. This time I used Gruyere. It's super simple to make because the oven does all the work and you can cook vegetables alongside the chicken too. Simple and yummy.
Chicken and Asparagus
4 boneless skinless chicken thighs
4 squares Gruyere cheese
1 Tbsp olive oil
2 garlic cloves, minced
1/2 tsp freshly ground black pepper
1/2 bunch asparagus, trimmed
1 tsp olive oil
1 tsp salt
1/2 tsp freshly ground black pepper
1. Preheat oven to 350 F. Line a sheet pan with foil.
2. For each piece of chicken, place a square of gruyere cheese on one side and fold the other side over so the cheese is covered. Arrange all 4 pieces of chicken on the sheet pan. Drizzle olive oil over the chicken pieces and sprinkle with the minced garlic and 1/2 tsp black pepper.
3. Arrange the asparagus on the sheet pan next to the chicken. Drizzle olive oil over the asparagus and sprinkle with salt and pepper.
4. Bake the chicken and asparagus for 15-20 minutes, or until the chicken is cooked through and no longer pink.
Serves 2
Wednesday, January 20, 2010
Filet Mignon and Lola's Broccoli
My boyfriend used to have a roommate who was a chef. A real chef. He worked at Lola's Restaurant in Dallas for a while (while it was still open) and we went there to have dinner one time.
Oh. My. Gosh. It was so good. We let the chef choose our menu so each course was a surprise but it was all so good that we didn't care. One dish in particular that surprised me was the broccoli. Just a huge plate covered in broccoli. After lots of nagging and smiles, I finally got the recipe for it. It's not exact since I'm only making enough broccoli for myself and not four people but man oh man is it good.
Filet Mignon and Lola's Broccoli
Filet Mignon (adapted from Ina's recipe):
1 (8 oz) filet mignon
1 Tbsp vegetable oil
1/2 Tbsp fleur de sel
1/2 Tbsp coarsely cracked black peppercorns
1 Tbsp unsalted butter, at room temperature
1. Preheat oven to 375 F. Heat a large stainless steel skillet over high heat until very hot.
2. Meanwhile, pat the steaks dry with a paper towel and brush with vegetable oil on all sides. Coat all sides with the fleur de sel and black pepper, pressing lightly as you go.
3. Add steak to hot skillet and sear for 2 minutes on each side. Top the steak with butter and place in the oven. Cook for 6-8 minutes for medium rare.
4. Remove the steak to a serving platter, cover tightly with aluminum foil and let rest for 10 minutes. Serve hot with broccoli on the side.
Broccoli:
1 Tbsp olive oil
1/2 broccoli crown, trimmed
1/2 small onion, thinly sliced
2 Tbsp olive oil
1 Tbsp canola oil
2 anchovy filets, finely chopped
1 garlic clove, minced
1 tsp Dijon mustard
1. In a medium skillet over medium heat, heat 1 Tbsp olive oil and cook the broccoli and onions.
2. Meanwhile, prepare the vinaigrette. Combine last six ingredients in a small bowl and stir until combined. Toss with hot broccoli and serve.
Serves 1
Monday, January 18, 2010
Salmon Fish Sticks
Yesterday I returned to Austin; my last semester of college starts tomorrow. Today I went to the grocery store because, well, I have a food blog. I've never seen so many people at a grocery store at one time. I waited in line for at least 15 minutes just to check out. And let's not get into how long it took me to find the kind of lettuce I wanted. So. Many. People.
The funny thing is, tonight I cooked what I already had in my refrigerator. I was a little skeptical when I saw Giada making this on Food Network but decided to give it a try. I thought the fish sticks would be soggy and wouldn't be able to be held but in fact, they were crisp and perfect. Here's to the Omega-3!
Salmon Fish Sticks
Adapted from Everyday Italian
Fishsticks:
1 4-6 oz salmon fillet, deskinned
2 Tbsp all-purpose flour
1/2 tsp garlic salt
1/4 tsp freshly ground black pepper
1 egg white
4 Tbsp seasoned breadcrumbs
3 Tbsp Gouda, grated
Olive oil
1. Preheat the oven to 450 F. Pat the salmon fillet dry with a paper towel. Cut the fillet into 4 pieces lengthwise.
2. Place the flour in a small bowl and season with salt and pepper. Place the egg white in another bowl and beat until frothy. Combine the breadcrumbs and cheese in a third bowl.
3. Coat the fish pieces in flour, dip in the egg white, and roll in bread crumbs, gently pressing the mixture into the fish. Place the salmon pieces on a well-oiled baking sheet. Drizzle lightly with olive oil. Bake for 15 minutes or until golden brown.
Dipping Sauce:
1 Tbsp reduced fat mayonnaise
1 Tbsp plain yogurt
1/2 tsp Dijon mustard
1/2 tsp chopped fresh basil
1. Mix all ingredients in a small dipping bowl and serve alongside the fish sticks.
Serves 1
Monday, January 11, 2010
New Cookbook
Today I bought the Barefoot Contessa Cookbook! I've been eyeing it for quite some time now and I finally treated myself to it. I'm excited to try the recipes soon! So this brings my cookbook count up to...four. Four little cookbooks. A small number but I love them oh-so-much.
Molten Chocolate Cakes
Have you ever been to Roy's? Have you tried their molten chocolate cake? If not, stop reading, do yourself a favor, and go eat one of their molten chocolate cakes. But before you go, I warn you that the cakes must be ordered in advance (when you order your meal) because they are made-to-order. Also, they are $9 a cake. Yes, I know, how do I afford a tiny $9 chocolate cake? Trust me, if you like chocolate molten cakes, it is well worth it.
This morning I had to go to the dentist. I hate the dentist. I'm only 21 yet I have receding gums and sensitive teeth. So I think that in reward for me sitting through the dentist's (painful) poking and prodding, I deserve a molten chocolate cake.
Molten Chocolate Cakes
Adapted from this recipe
2 (1 oz) squares Baker's semisweet baking chocolate
1/4 cup butter
1/2 cup powdered sugar
1 egg
1 egg yolk
3 Tbsp flour
1. Preheat oven to 425 F. Butter 2 (3/4 cup) custard cups or souffle dishes. Place on baking pan.
2. Melt chocolate and butter in a double boiler. Remove from heat and let cool slightly. Whisk in powdered sugar until well blended. Whisk in egg and egg yolk. Stir in flour. Divide batter between the two souffle dishes.
3. Bake 10 minutes or until sides are firm but centers are soft. Invert cakes on dessert dishes.
Yield: 2 cakes
Sunday, January 10, 2010
Seared Tuna and Asparagus
Warning: college-student-unfriendly recipe ahead.
Now that I've warned you, I can tell you that I have an obsession with onions. I love them. They are my absolute favorite vegetable and I could eat them everyday. But I don't. I don't want to smell like an onion. So when I do cook with onions, I make sure to use as much as possible. I was going to order a pizza tonight since I'm home alone but decided that since I hadn't had onions in a while, tonight would be the perfect time to stink up the house with them. Also, I went to the Mavericks game last night and ate a foot-long chili cheese dog and loads of fries so I felt like I should eat something a little more healthy and a little less fried (even though pizza is not fried).
Seared Tuna with Soy-Onion Sauce and Garlic Asparagus
Tuna with Soy-Onion Sauce:
1 Tbsp extra virgin olive oil
1/2 small onion, finely chopped
1 tsp butter
1 Tbsp low sodium soy sauce
1 sushi-grade ahi tuna steak
1/2 Tbsp salt
1 tsp black pepper
1 Tbsp unsalted butter
1. Heat olive oil in small skillet over medium heat. Cook onions until tender and lightly browned, about 5 minutes. Add butter and soy sauce to pan and stir until mixed. Remove from heat and transfer to small bowl.
2. Sprinkle salt and pepper on both sides of the tuna.
3. Heat small skillet to medium-high heat. Melt butter in skillet. Place tuna in skillet and sear on one side for 2 minutes. Flip tuna steak over and sear on other side for 1-2 minutes. The middle should still be rare and very pink.
4. Remove from pan and serve with sauce.
Garlic Asparagus:
1 Tbsp butter
1/2 small onion, finely chopped
1/3 bunch asparagus, trimmed
1 garlic clove, minced
salt and black pepper, to taste
1. Melt 1 Tbsp butter over medium-high heat. Place onions and asparagus in pan and cook until asparagus is tender and onions are lightly browned, 5-10 minutes.
2. Add garlic, mix, and turn off heat. Let sit for 1 minute.
3. Season with salt and pepper and serve.
1 serving
Friday, January 8, 2010
Buttermilk Pancakes
Good morning!
I've been sleeping for 11-12 hours every night lately and waking up too late to eat breakfast so today, I decided to wake up early and change that.
Normally I make waffles because I love my waffle iron and the little nooks are great for holding lots of butter and maple syrup (I'm a true maple syrup snob. None of that artificial syrup for me). However, I left my waffle iron in Austin so I've decided to try my hand at pancakes. I'm awful with a spatula. The batter goes everywhere instead of in the pan. But I tried. At least I got to use my pink tulip-shaped Williams-Sonoma spatula. Yes, it is for kids. Yes, it is cute, Yes, it works.
The book I took this recipe from says to "avoid overmixing the batter to ensure that the pancakes will be airy." It also says to use homemade buttermilk, with an accompanying recipe. I didn't do that. I mean, I woke up early to make the pancakes - I didn't think it was necessary to wake up (or not go to bed) at 11 pm and wait 12 hours to make the buttermilk.
Buttermilk Pancakes
Adapted from The Home Creamery
1 cup all-purpose flour
1 Tbsp sugar
1 tsp baking powder
1/4 tsp salt
1 cup buttermilk, stirred well
1/4 cup milk
1 egg
1/2 tsp pure vanilla extract
1/8 cup butter, melted
1. Whisk together the flour, sugar, baking powder, and salt in a medium mixing bowl.
Whisk the buttermilk, milk, egg, and vanilla extract in another bowl. Add the buttermilk mixture to the dry ingredients and stir until just blended but still lumpy; do not overmix.
2. Spread 1/2 tablespoon melted butter on a hot griddle over medium heat. Pour the batter by 1/4 cupfuls onto the hot griddle, spacing 2 inches apart. Cook until bubbles break on the surface, about 3 minutes. Turn pancakes over. Cook until bottoms are golden, about 3 minutes. Transfer to plates. Repeat with remaining batter, adding butter to skillet as needed.
Yield: 10 pancakes
Thursday, January 7, 2010
Salmon and Broccoli Rabe
I'm excited to introduce to you the first ingredient of the monthly installment entitled "Foods I've Never Cooked Before." Yes, that is the name I chose for this project. I actually chose it just now. January's food is....(drumroll please)
broccoli rabe
Broccoli rabe is also known as Rapini or Italian broccoli. I'm sure many people have cooked broccoli rabe before and I've seen it around for several years but had no idea what to do with it. I researched a bit and found there are two camps when it comes to cooking broccoli rabe: those who boil and those who saute. Those who boil claim that boiling removes most of the bitterness associated with this vegetable. I decided to make the best of both worlds and boil and saute. Maybe next time I will try one or the other and decide which I like better. But for today, compromise it is. Also, some only eat the leafy greens while others eat leaves and stems. I didn't want to waste so I trimmed the very end of the stem but cooked the broccoli rabe with both leaves and stems.
Salmon and Broccoli Rabe
Salmon:
4 salmon (or steelhead) filets, deboned and skin on
lemon pepper seasoning, to taste
freshly ground black pepper, to taste
1/4 cup low sodium soy sauce
1 tsp honey
1 tsp maple syrup
2 cloves garlic, minced
1 Tbsp extra virgin olive oil
1. Combine soy sauce, honey, maple syrup, garlic, and olive oil in a small bowl. Sprinkle salmon filets with lemon pepper seasoning and black pepper. Lay filets, skin down, in a shallow glass baking dish and pour marinade over. Refrigerate for 30 minutes.
2. Preheat oven to 425 F. Create a foil packet for each salmon filet. Place one filet in each packet. Place packets side-by-side in a clean, shallow baking dish and bake for 12-15 minutes or until salmon flakes with a fork and is still pink in the center. Be careful not to overbake.
3. Remove salmon from packet and place on the bed of broccoli rabe. Serve and enjoy!
Broccoli Rabe:
1 pound broccoli rabe, trimmed
3 Tbsp extra virgin olive oil
2 garlic cloves, minced
salt and pepper, to taste
1. Bring a large pot of salted water to a boil. Place broccoli rabe in pot and cook until slightly tender but not mushy, 3-5 minutes. Drain.
2. In a large skillet over medium heat, heat the olive oil and saute the garlic until fragrant, about 30 seconds. Add broccoli rabe and saute for 10-15 minutes or until tender. Sprinkle lightly with salt and pepper.
Serves 4
Wednesday, January 6, 2010
Snickerdoodles
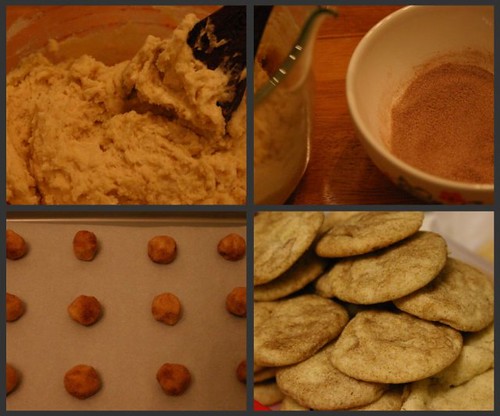
I love snickerdoodles. Whenever I order cookies, I always make sure to order at least some snickerdoodles and I'll choose them over chocolate chip cookies any day. I bet it's the cinnamon - I love cinnamon - that makes them so yummy. (I add lots more cinnamon to coat than others might but it's all up to you). After making several different kinds of snickerdoodle cookies, I've settled on a recipe that I've kept in heavy rotation for about three years. Everyone loves these and I hope you will too.
A few notes about this recipe:
- The cookies will look slightly undone when they are ready to take out of the oven. If your cookies are golden brown all over, they are overdone.
- If you have 2 baking sheets, take advantage of them. That way, you don't have to wait for one baking sheet to cool before placing your cookie dough balls onto it. (The cookie dough will become mushy and the sugar has a chance of sticking to the parchment instead of to the cookies).
- These will keep in an airtight container for a few days. Just be sure it is really airtight or you will have hard cookies.
Snickerdoodles
1 cup butter
1 1/2 cups white sugar
2 eggs
2 3/4 cup all-purpose flour
1 tsp baking soda
1/2 tsp salt
1 tsp pure vanilla extract
2 Tbsp white sugar
1 Tbsp cinnamon
1. Preheat oven to 375 F. Line a rimmed baking sheet with parchment paper.
2. In a large bowl, cream together the butter and sugar. Beat in eggs. Stir in flour, baking soda, and salt until combined. Stir in vanilla.
3. In a small bowl, mix together 2 Tbsp white sugar and 1 Tbsp cinnamon. Roll cookie dough into tablespoon-sized balls and roll in cinnamon-sugar mixture. Place on cookie sheet, 2 inches apart.
4. Bake for 8-10 minutes or until edges are slightly brown.
Yield: 3 dozen
Tuesday, January 5, 2010
Butternut squash cookies and muffins
A few recipes from the past to start.
This past fall, I had an obsession with butternut squash. I bought it in bulk at Costco and ate it plain, mixed with other things, as soup, and then proceeded to make cookies with them. If you like pumpkin things, I recommend you try these squash cookies. Yes, they sound weird but (pre-cubed) butternut squash becomes really soft and sweet when baked in the oven at 400 F for about 20 minutes. (Just be sure you sprinkle some water over them before baking or they will burn). I added lots of spices but you can add as much or as little as you want.
Squash Cookies and Muffins
1/2 cup butter, softened
3/4 cup white sugar
3/4 cup packed brown sugar
2 eggs
1 1/2 cups mashed, cooked butternut (or any winter) squash
1 tsp vegetable oil
2 1/2 cups all-purpose flour
1 tsp baking soda
2 1/2 tsp baking powder
1 Tbsp ground cinnamon
1 tsp ground nutmeg
1/2 tsp ground ginger
1/4 tsp ground allspice
1/2 tsp salt
1. Preheat oven to 375 F for cookies or 350 F for muffins. Line a rimmed baking sheet with parchment paper.
2. In a large mixing bowl, cream together butter and white and brown sugar. Beat in eggs and squash. Mix in vegetable oil. Stir in flour, baking soda, baking powder, spices, and salt until well blended. Roll into tablespoon-sized balls and place on cookie sheet.
3. Bake cookies for 10-12 minutes or until edges are golden. Bake muffins for 20 minutes or until a toothpick inserted in the center comes out clean.
Yield: 3 dozen
Away we go
Dear reader,
If you don't know who I am, let me introduce myself. I'm Alice and I'm in my last semester of undergraduate studies at The University of Texas at Austin. I will be entering medical school in the fall in hopes of pursuing pediatrics or oncology (or pediatric oncology!). I love photography, read a lot of fiction, obsessively check weather.com, and love winter. I've also been wishing for a Toyota Prius (that I wrote a 40-page research paper on) and a puppy for years. Sadly, neither wishes have come true.
After months and months (probably close to a year) of debating whether or not to start a food blog, here I am. Originally, I wanted to call the blog "One Month" with the idea that I would share a list of things that I loved that month: a book I read, a CD I bought, and of course, a recipe I loved. But someone else already has that blog title so here's mine.
This blog's premise is a little different. I am opening up my (tiny) kitchen to you and sharing daily recipes. In addition, I have decided to choose one ingredient each month that I've never cooked with and make a fantastic recipe with it. I've already got a list that includes quail, rhubarb, and celery root so this should be quite an adventure. If you're ready, then away we go!
Subscribe to:
Posts (Atom)